Three Clean and Simple Ways to Use Rinea Foil

We have a guest designer with us today, Kymona. I met her at the AFCI convention, and I knew she had to play with the Rinea foil to see what she could create with it, and she did an amazing job!! Here is a little bio and her beautiful picture!
Hello, I'm Kymona Tracey. Who am I, you ask? I am a woman who never slows down and loves it. Yes...I am the energizer bunny's sister! I just keep going and going. I was introduced to paper crafting back in 1998 when my son was born. I started out as a hobbyist, but my passion pushed me into teaching paper crafting classes at work and to those that wanted to learn.I love card-making, scrapbooking, DIY projects or better yet anything that has to do with paper.
Hello, I'm Kymona Tracey. Who am I, you ask? I am a woman who never slows down and loves it. Yes...I am the energizer bunny's sister! I just keep going and going. I was introduced to paper crafting back in 1998 when my son was born. I started out as a hobbyist, but my passion pushed me into teaching paper crafting classes at work and to those that wanted to learn.I love card-making, scrapbooking, DIY projects or better yet anything that has to do with paper.

Hello everyone!! Kymona from Kreative Kymona here for the first time as a guest designer!! I'm super excited to be here! I'm going to show you three clean and simple ways to use foil paper!
Let's get started!
Take a look at card number one:
Using Foil Paper as the Focal Point!
Let's get started!
Take a look at card number one:
Using Foil Paper as the Focal Point!

Using Rinea foil paper as the focal point creates a clean and simple card!
To create this card:
Take a look at card number two:
Using Rinea Foil Paper to Balance Out the Card Design!
To create this card:
- Cut the card base to 6.25 by 7.50 scored at 3.75.
- Using a die cutting machine, run the Rinea foil paper with The Ton Stamps Hello sentiment die, through the machine. Once with the silver foil paper and once with the blue foil paper.
- Adhere the silver sentiment first using Tombow Mono Liquid Glue. Then adhere the blue foil sentiment die cut on top of the silver, in an offset manner. Offsetting the sentiment creates dimension.
- Using a corner rounder, round all of the corners.
Take a look at card number two:
Using Rinea Foil Paper to Balance Out the Card Design!

To create this card:
- Cut you card base to 4.25 by 11 scored at 5.50.
- Then prepare your card stock for paint. Add tape to the score line to prevent paint from touching the backside of the card.
- Use an old gift card and pull the paint down the card stock. After each swipe, wipe the gift card off. Then repeat the process until all of the paint dots are smeared.
- Using a die cutting machine, die cut My Favorite Things Many Thanks Die using the silver Rinea foil.
- Adhere the foiled die cuts to the card front using Tombow Mono Liquid Glue.

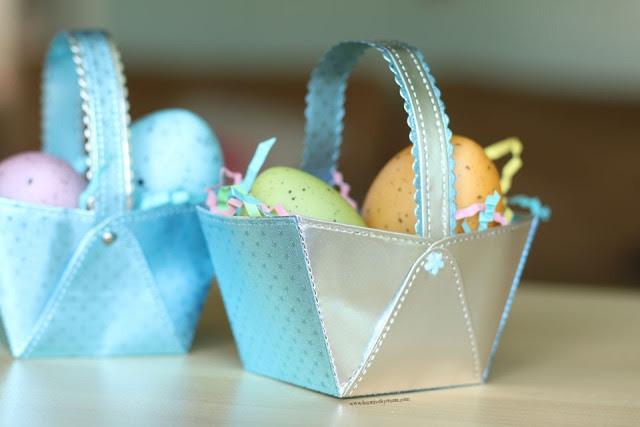
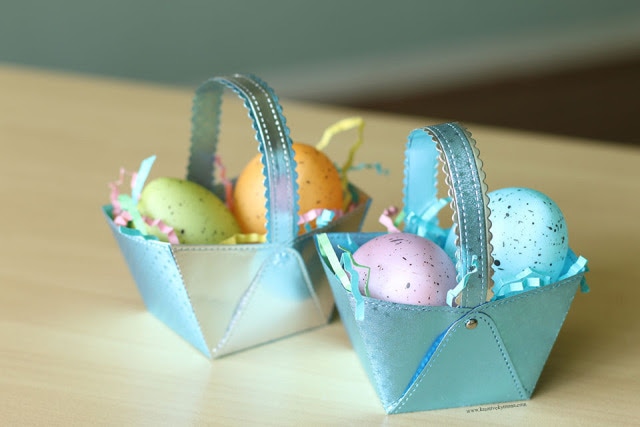
Take a look at project number three:
Using Rinea Foil Paper for the entire Project!
Using Rinea Foil Paper for the entire Project!

Using Rinea foil paper as the project takes Rinea foil paper to the next level!
To create these baskets:
To create these baskets:
- Using a die cutting machine, cut the blue and silver foil using Mama Elephant Cute Basket die cut and cut out all of the pieces of the foil paper.
- Assemble the basket according to the instruction that comes with the die.
- Change up the basket colors by mix and matching the different color Rinea foils.
- Once the baskets are together, add the cripple paper and eggs!

|
|
I love how the foil looks. So pretty and different than regular cardstock. Rinea Foil paper folds and rips just like paper, but it is much prettier. Its a bit lighter than cardstock but heavy enough to create these baskets and hold these eggs without fear of ripping.
Easy and requires a bit more assembling but it's worth it.
So what do think? Will you give Rinea Foil paper a try? I think you should. The possibilities are endless. Please let me know what you think. I would love to hear from you.
Thank you so much for stopping by!
Easy and requires a bit more assembling but it's worth it.
So what do think? Will you give Rinea Foil paper a try? I think you should. The possibilities are endless. Please let me know what you think. I would love to hear from you.
Thank you so much for stopping by!

Kymona Tracey specializes in paper crafting, knitting, and I'm slowing learning how to scrapbook using pocket pages which you will find on my blog Kreative Kymona. My style is clean and simple, and I do all of my craftings at midnight. That's when my creative seems to spark.
Spark Your Creativity!