Foiled Floral Easel Card by Jenn DuBell

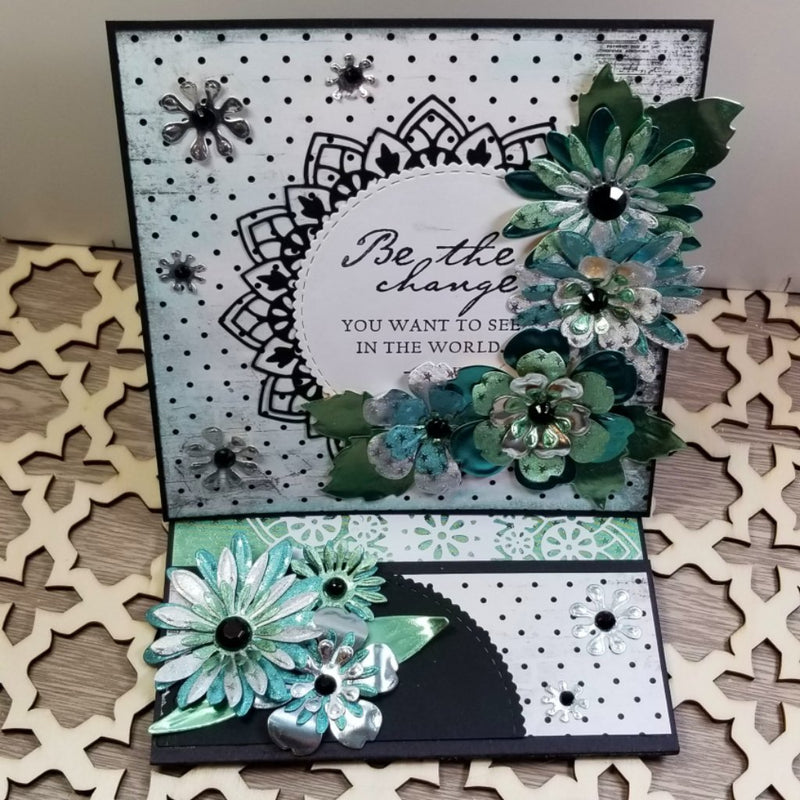

Hello everyone! Jenn here to share a pretty easel card I created using die cut flowers and Rinea Foiled papers.
I love this palette of black and white with the turquoise,jade green, and silver foiled papers!
Silver/Gold Glossy Foiled Paper
Silver/Silver Starstruck Foiled Paper
Turquoise/Gold Glossy Foiled Paper
Turquoise/Turquoise Starstruck Foiled Paper
Jade/Gold Glossy Foiled Paper
Jade/Jade Starstruck Foiled Paper
Using a mix of the glossy and starstruck foiled papers adds texture to the floral die cuts.
To create the card the die cutting was my first step. I cut several flowers using dies from my stash.

I cut more than I actually used but these can be stored and used for another project. Next I cut a mandala die from white cardstock, one from white, and a scalloped circle die from each as well. I then laid the parts out and began building my flowers to get a visual of my card before doing any gluing or construction.

After rearranging a few times, I inked the edges of my patterned paper using both Black Soot and Salvaged Patina Distress Inks.
For the easel base:
Cut black cardstock to 5 1/2" X 11 1/2". Score at 2 3/4" , 5 1/2", and 11". This will leave a 1/2" tab at the bottom to add a pocket. Create the pocket using black cardstock cut to 6 1/2" X 2". Score both sides at 1/2".Press the 1/2" score lines flat. These will adhere to the card bottom inside on the 1/2" scored flap.
Add jade starstruck foiled paper to inside along with the white mandala die cut. Add glue to the 1/2" scored side tabs and adhere pocket. Decorate as seen.

Card front:
Cut another piece of black cardstock to 5 5/8" X 5 5/8" to make a base. Adhere the patterned paper leaving a small black edge all the way around. Next I adhered the black die cut mandala, white scalloped circle (stamped with sentiment). Carefully build the flowers alternating colors and textures. I added some bling to my flower centers as well. Use flower making tools to fluff the petals for more dimension.


This is such a fun project! The pocket can be used for a gift card or other surprise.
Thanks so much for visiting the blog and viewing my project today!
Be sure to visit Rinea online for more inspiration and amazing products!
Rinea Inspires Blog
Rinea Online Store
This was definitely a fun one! Until next time have a wonderful crafty day!
Jenn