Fourth of July Wreath by Annie

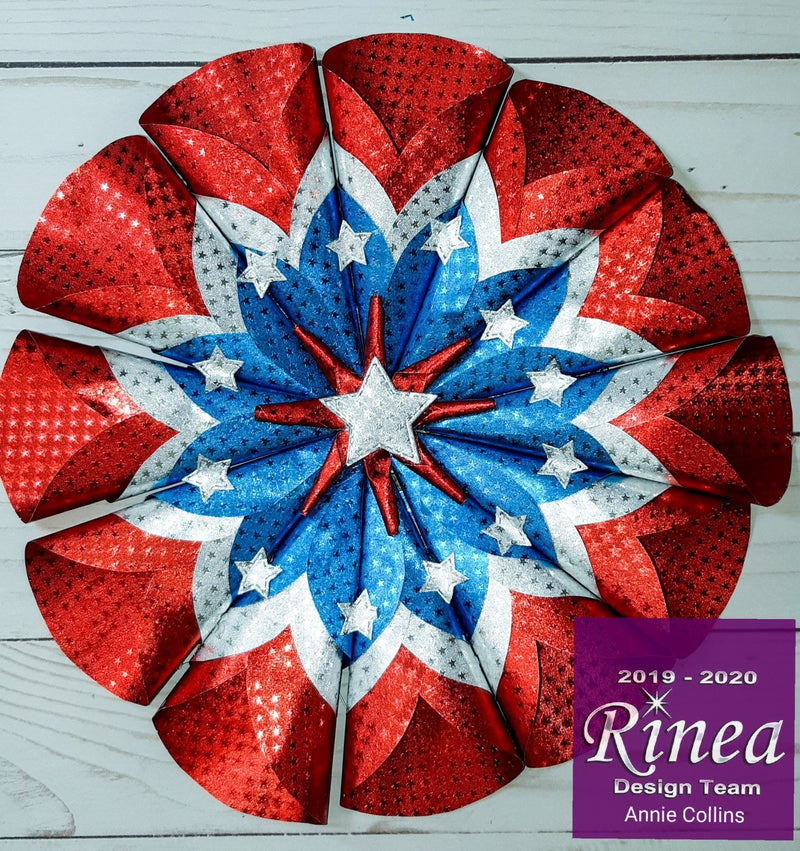
Hello Crafty Friends - Annie here with a quick and easy 4th of July Wreath.

Materials Used:
Brother Scan n Cut for water drop shapes
Lawn Fawn Stitched Star Die
Chipboard
Lawn Fawn Twine
Aleene's Tacky Glue
Hot Glue Gun and Glue sticks
Let's get started!
I started by cutting the water drop shape in 3 sizes on my Brother Scan n Cut. However, if you do not have an electronic cutting machine, you can draw the water drop shape.
I then traced and cut the water drop shapes onto the Foil paper 12x in each color. I did the large shape in the Ruby/Ruby Starstruck Foil Paper. The medium one in Silver/Silver Starstruck Foil Paper and the small in the Sapphire/Sapphire Starstruck Foil Paper.

Next, I die cut the 3D Roll Star shape from die #2 from Ruby/Ruby Starstruck Foil Paper. I also die cut the star for the center and the small stars for the accents from Silver/Silver Starstruck Foil Paper & from chipboard (please note that the star dies I have in the photo are not the dies I ended up using they were too large for what I needed and changed them to the Lawn Fawn Star die)

I then created the 3D star, and I covered the chipboard star with the Silver/Silver Starstruck Foil Paper. I used a Silver sharpie to color the edge of the chipboard star before adhering the Foil paper.


Then, I added a double layer of foam adhesive to the back of the star and centered it onto the Rolled Star. I then set the star aside while I worked on the rest of the wreath.


Next, I start creating the cone shapes that will become the wreath. I roll each water drop shape into a cone and adhere the ends together (I used hot glue - however, I did a few with some tacky glue, and it holds wonderfully)

Next, I put a bit of glue on the back of the Ruby/Ruby Starstruck Foil Paper cone and the Silver/Silver Starstruck Foil Paper cone and insert them into one another. Then, I added them into the Sapphire/Sapphire Starstruck Foil Paper cone. I repeat this for all 12 shapes.


Then, I adhere all the stacked cones onto a chipboard circle (you can cut this freehand it doesn't have to be perfect because it will not be seen).


Finally, I add a bit of Twine to the back of the chipboard circle. Next, I
cut a circle shape and adhere it to the back of the wreath to cover the chipboard piece

Now, I flip the wreath over and adhere the star to the center of the wreath. I adhered a few of the tiny stars for accents (this is optional).
Your Wreath is now complete and ready to be displayed.
- Please note that this is an indoor wreath.

Thank you for stopping by the blog today - I hope you found some inspiration!