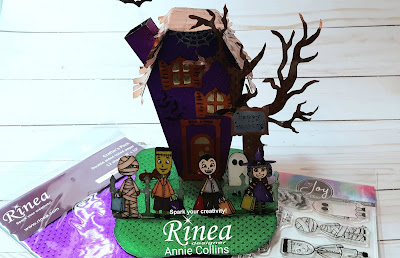
Happy Haunting with Rinea & Joy Clair Stamps by Annie

Hello Crafty Friends - Annie here with a fun and Haunting project for you today.
We're collaborating with Joy Clair Stamps all the month of September.

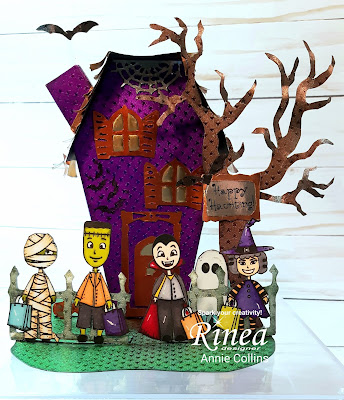
I created a Coffin Shaped Haunted House for our adorable Trick or Treaters.

Materials Used:
Distress oxide ink in Black Soot
Staz-On Jet Black Ink
Aleene's Tacky Glue
Recollections Brand: Heavy Weight Black Cardstock
Acetate
Memento Tuxedo Black Ink
Spectrum Noir Markers
Neenah Solar White 80lb cardstock
Let's get started!
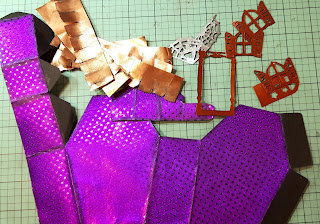
I cut all the components for the coffin house from black cardstock. I stamped and colored the images from Joy Clair October Fun Stamp. For the Coffin, I used an SVG cut file from Simply Crafty SVG's.
I simply enlarge the file so that it was bigger than the kids.
Then, I adhered all the components to the Rinea Foil paper. I added the cardstock because this little haunted house is actually a treat box. The back opens up for you to place treats into the house. Since I knew it would be getting so wear I figured - back it with cardstock.
I trimmed all the components and ink them with some Distress oxide ink in Black Soot. It covers all the white edges of the Rinea Paper and it gives it a spooky look too.
Creating the house:
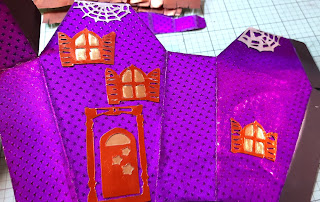
The house is cover in Starstruck Voilet Rinea Foil Paper.
All windows and door are covered with Glossy Marigold Rinea Foil Paper.
I back all the windows and doors with Glossy Gold Rinea Paper to give them a glow. The spiderweb & tombstone are cover with Glossy Silver Rinea Foil Paper
I adhered the door, windows, spiderwebs & tombstone.
Then, I stamped the cluster of bats from the Joy Clair October Fun Stamp set on the front, back and sides of the coffin haunted house.
I also stamped the letters RIP on the tombstone.
I adhered a little die cut Bat that I cover with Glossy Copper Rinea Foil Paper

Next, I put some adhesive on all the tabs and formed the Coffin.


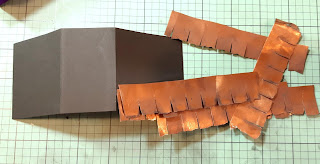
Then, I trimmed some black cardstock to 2.5" X 6.25" to form the roof for the house. I score the black cardstock at 2.25" from both ends. The shingles are cut from Glossy Copper Rinea Foil Paper
I add some adhesive to the top of the coffin house. I place the black cardstock onto the top. Hold firm in place until the adhesive holds. I make sure that the roof is centered front and back. I want a bit of an overhang.


Next, I adhered the shingles to the roof. Making sure to stager the little slits in the shingles. I repeat this on both sides of the roof.


When I get to the top of the roof I have a bit of black cardstock showing.
I cover this with another piece of Glossy Copper Rinea Foil Paper
which measures about 1-1/2"
I folded the Glossy Copper Rinea Foil Paper accordion-style on the long and short side. Again, inking with Black soot ink.


I add a bit of adhesive on the tab to form the chimney.
Then, I adhered a little strip of Glossy Copper Rinea Foil Paper to
the base of the chimney.


Next, I add some adhesive to the tabs of the base of the chimney and place it onto the roof.


Then, I add some adhesive to the bottom of the Coffin House and place it onto
the Starstruck Emerald Rinea Foil Paper field I made as the base for the scene.

Next, I create a small tab stand for the spooky tree that is cover
I simply fold a small square of cardstock into third and then adhere it together to make it sturdy. I then for the piece of cardstock into an L shape and adhere it the back of the tree.


I add some adhesive to the bottom of the L shape and tree. I place it onto
the Starstruck Emerald Rinea Foil Paper field next to the house.


For the fence - I covered it with Starstruck Jade Rinea Foil Paper. The fences have their own little L shape - I just add some adhesive to the bottom and
place onto the Starstruck Emerald Rinea Foil Paper field in front of the tree and house.


Now, for the little trick or treaters. I cut along the stamped edge of their arm so that I can adhere to their little treat bags in their hands. Then, I put a bit of adhesive on the back of the trick or treaters and press them onto the fences. The little ghost I adhered by the tree.


Next, I have some die-cut bats and jack-o-lanterns.
I covered the bats in with Starstruck Ebony Rinea Foil paper and
the jack-o-lanterns in Glossy Marigold Rinea Foil Paper and
Glossy Gold Rinea Paper. I also created the L shape stands for the
jack-o-lanterns. For one of the bats, I adhered it to a piece of acetate.
I stamped a sentiment onto Glossy Silver Rinea Foil Paper.


Then, I adhered the little framed sentiment onto the tree. Accented it with a bat. I adhered the bat that is on the acetate strip to the chimney. The jack-o-lanterns onto the field next to the house.


Now, the Coffin Haunted House with Trick or Treaters is complete!
Thank you for stopping by the blog today. I hope you found some inspiration!


