Hoe To Make a Rainbow Thank You Card by Monika Graefling-Gladysiak

Hello everyone! I hope you have a wonderful day. It's Monika today creating a Rainbow Thank You Card using Rinea Foiled Papers.

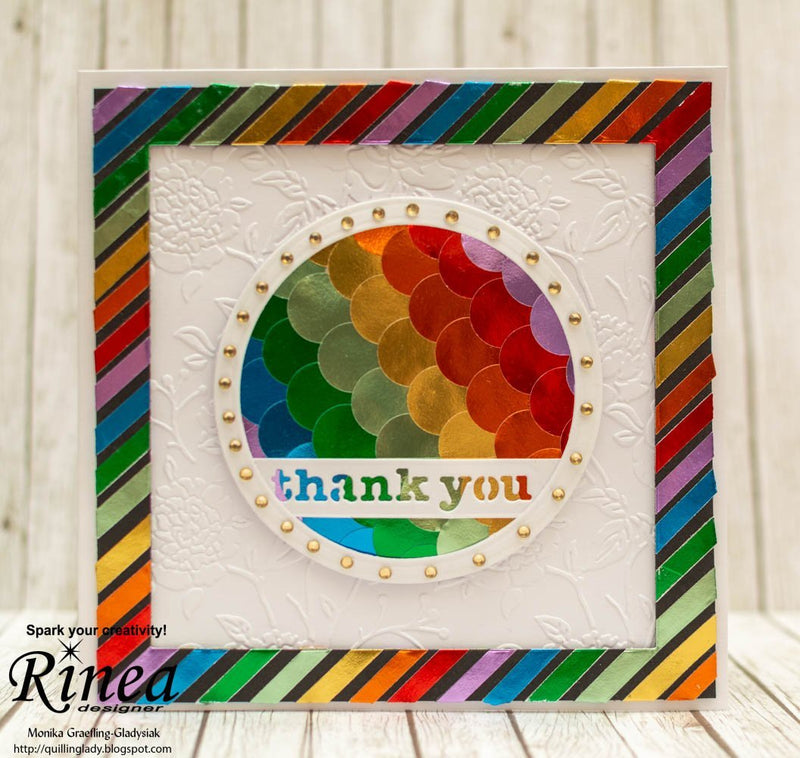
We are going to use Rinea Foiled Paper: Gold, Jade, Emerald, Sapphire, Lavender, Ruby, Marigold, black card, liquid glue, double sided foam adhesive, circle punch, circle nesting dies, square nesting cutting die, embossing folder (can be any embossing folder you have, I chose 'Pretty Peonies' from Chinoiserie collection by Crafter's Companion), 'Thank You' cutting die, white card, card base 6x6 inches, scissors and gold gems.

Step 1:
Adhere double sided tape on the back of all Rinea papers. Cut narrow stripes.
Start adhering the stripes on the black card (slightly smaller than your card base) from the top left corner diagonally going in rainbow order to create a nice pattern. Then use a square nesting cutting die to create a rainbow frame.
Using an embossing folder of your choice, emboss the white card for the back panel of your card.


Step 2:
Using two circle nesting cutting dies create a circle frame and circle element, die cut 'Thank You' sentiment. Adhere the rainbow frame on the embossed panel using double sided foam adhesive for extra dimension.

Step 3:
Use a circle punch to create small circles from Gold, Jade, Emerald, Sapphire, Lavender, Ruby, Marigold Rinea foiled papers. Adhere the circles on the circle panel using liquid glue, cut off the excess of the paper and adhere the 'Thank You' sentiment and circle frame at the top. Stick the circle element on the embossed panel and add small gold gems.
Add the panel onto the card base.


Step 4:
You have a beautiful rainbow Thank You card ready to give to an amazing person.
Happy crafting!