How to Make an Origami Christmas Tree with Susie Bentz

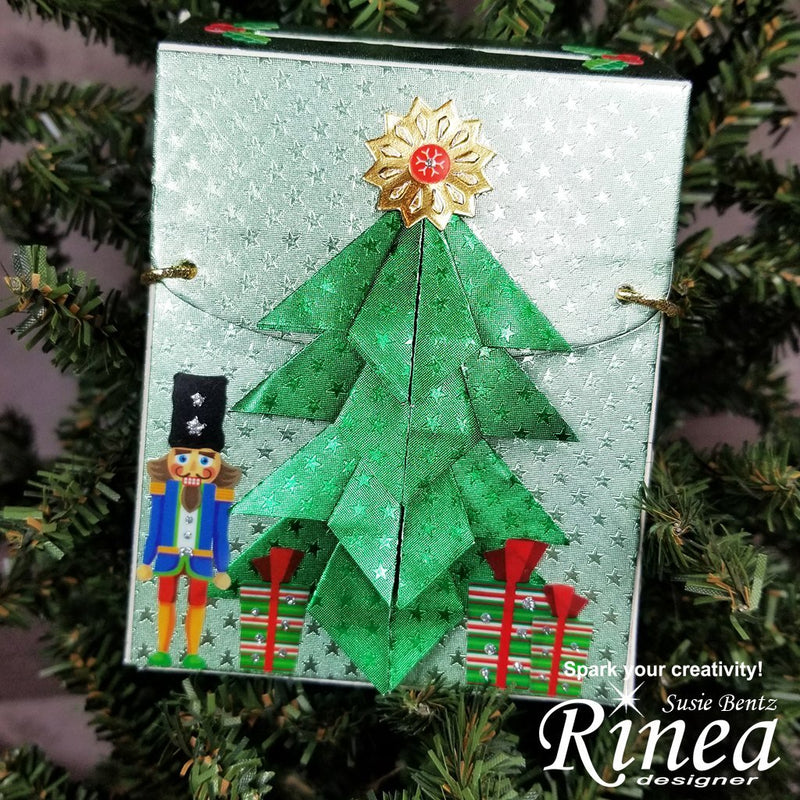
Hello! Susie here today and I think gift cards are going to continue to be a popular Christmas present this year. I decided to decorate this Post Box to create a stylish way to "wrap" one. I have been creating this origami Christmas Tree for years and could not wait to try it with Rinea Foiled Papers! It may look complicated but I took lots of pictures and trust me - it is super simple!

Let's start by cutting the dimensional tree! I cut 4 squares from Emerald/Emerald Starstruck Foiled Paper:
- (1) - 2.5" square
- (2) - 2.25" square
- (1) - 2" square.
I show a bone folder in the images below but I actually did not need it because the Foiled Paper creases so beautifully!

- Fold the square in half, giving it a good crease with your finger.
- Open the square and fold it on the diagonal, again giving it a nice crease.

- Open the square again, rotate it 90 degrees, and fold it on the other diagonal. Crease.
- Open the square again and collapse in the sides as shown in the picture.
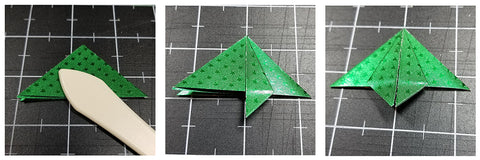
- It folds into a flat triangle.
- Fold the right side of the triangle (top layer only) to the center and crease the fold. Tip: Use the grid lines on your cutting mat to position the triangle and to make the fold precise.
- Repeat with the left side of the triangle, folding the top layer to the center. Crease.
- Repeat with the remaining 3 triangles and set them aside.
 To create the Post Box base, I used Therm O Web Adhesive Sheets to adhere Jade/Jade Starstruck Foiled Paper to a piece of matboard before running it through the Big Shot machine. The Foiled Paper is only 12" long and the matboard die cut is almost 13" long. Not a problem!
 I simply apply the double sided adhesive to a piece of Jade/Jade Starstruck Foiled Paper and die cut the flap portion of the box. Peel off the protective sheet, revealing the adhesive and adhere it in place. Perfect! Fold along the score lines and assemble the box using Red Liner Tape.
I started with the largest (2.5") piece of origami and applied a strip of adhesive on the bottom edge of the back. I positioned it so that the tip just clears the bottom of the box. To add the second piece (2.25") I stacked it on top of the base piece, slipping the tip of the bottom triangle into the folds of the one on the top. Liquid adhesive works great to adhere this piece.  I closed the flap of the box by punching holes in the sides and adding gold elastic cording to hold it in place. For the top of the tree, I stacked the last origami pieces with the smallest one (2") on top. I stacked them together - slipping the point of the bottom triangle into the folds of the top before glueing them together - and then adhered them to the flap.
 I die cut a "star" for the top of the tree from Gold/Gold Glossy Foiled Paper. I think it is beautiful just like this but...
 ...I did have some cute stickers that worked perfectly to decorate the box!
 Perfect for gift giving - a gift card will slip into that slot on top!

NOTE: It is really easy to adjust the size of the Christmas tree by adjusting the size and number of squares that you use. I did a trial run with computer paper to help me decide before I cut the Foiled Paper. I increased the size of each square by 1/4". If you have square nesting dies they are great for this project. Have fun and be careful - it's addictive!