How To Make A Box Frame Card - "Tea in a box" by Natalie Ballard

Joy Clair Designs and Rinea: This month we are doing a collaboration as part of the Rinea DT with Joy Clair stamps. These are totally new to me, and I really struggled with sticking to the budget as there are so many fab designs!
You will need:
- Arctic Rinea Foiled Paper in Starstruck
- Pastel Rinea Foiled Paper Pack
- Laser printer
- Joy Clair Designs "Cup of Joy" Digital Stamp Set
- Joy Clair Designs "Succulent Frame" Digital Stamp Set
- Acetate (the thicker the better for this project as its used to reinforce your design).
- 12x12" 250-300gsm cardstock ( I used Limetree Crafts White Topaz Shimmer 250gsm)
- Shadow box die or cut file
- Ghost Ink 2.0
Building the Shadow Box
We adapted one of our Shadow Box cut files to create the base design, but you could use a box shadow die and resize your pieces accordingly. You then want to add a door panel (shown below in blue) which covers one side edge as well as the main centre of the box. You can size this so it has a slight overlap as shown if you wish, but I trimmed mine to fit. This should be cut from strong cardstock as it will form the core of the design.

Printing onto Rinea Foiled Paper
The technique I've used needs a Laser Printer to work properly. Now, to avoid bubbling the paper, I would recommend allowing your printer to cool between sheets (this project requires 4 printed sheets). You don't need any specialised settings though. I did trim the sheets down to a size my printer could cope with.
Start by opening your stamp designs in Affinity Photo, Photoshop or similar image editor.

Start by creating a new document ([File]-[New]) which matches the size of your door panel. Copy in your frame design by circling it with your lasso, copy it ([CTRL]+[C]). Trim your piece of Arctic foiled paper to match the document size (no need to worry about printer boundaries with this design).

For the other colours we will create another document to the same size as your trimmed pieces for your printer.


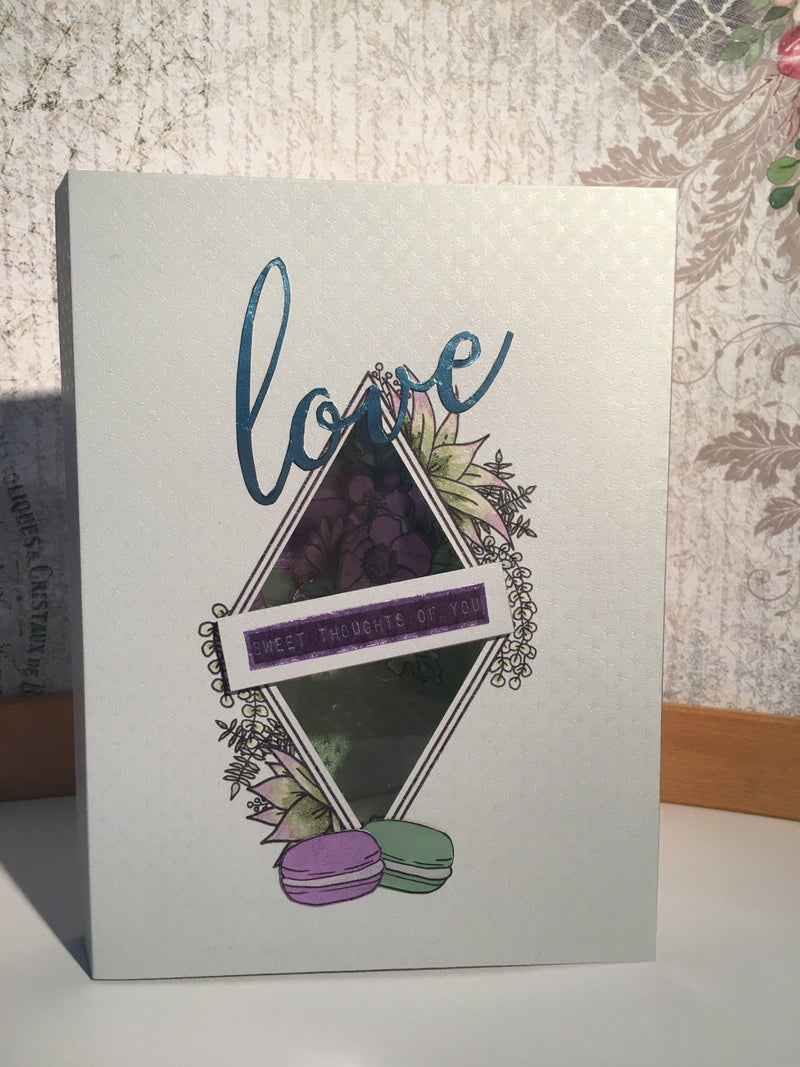
For the turquoise sheet, I added the love sentiment using a script font and used "Stroke" to outline it ready for cutting.
Colouring onto the Printed Rinea

We recommend using alcohol markers for this process:
- Le Plume: YG642, YG647
- Nuvo: 439
- Harmony: Cabbage
These shades blended lovely without needing a blender pen at all.

You can use a ScanNCut to cut the aperture if you like, but you could just as easily do this by hand.

I used the Xyron Machine to apply adhesive evenly across the back of the foiled piece so we would have a neat finish. If you don't have a Xyron, just cut an additional identical cover piece to hide your adhesive.
The piece with the adhesive is then applied to thick acetate to reinforce the piece.
You can then add the "love" and the "sweet thoughts of you" sentiments to your front along with a pair of macaroons.


Building the Shadow Box

With your shadow box now cut, apply a piece of Jade Starstruck to the central panel before folding you side panels in.


Decorating the Shadow Box

Start with your cup for your central panel; I also used a little ghost ink to add detail with a Cut N Dry nib and the refill. Top Tip: use wet glue to give you tim to check alignment and tweak if needed.
You can then shape and add your flowers and foliage along with the other pair of macaroons.


Once your arrangement is complete, you will want to protect it using another piece of acetate. You want to score your acetate slightly smaller than your aperture so it fits nicely. It may take a couple of attempts to get a good fit.
Pop this in and finish with additional flowers if needed to hide any flaws. Keep these fairly flat.

