Beautiful Foiled Paper Peacock by Charity

Charity here from Scrappin' Chaos with a beautiful, decorative bird made from the new Peacock Foiled Paper Variety Pack. This proud peacock displays his Sapphire, Emerald, and Violet plumage with style. Rinea Foiled Paper holds it's shape to form the curve of the body, feathers, and neck. The instructions below are lengthy but not difficult to follow.

Supplies:
Cardstock
Decorative Punch
Decorative Punch

Instructions
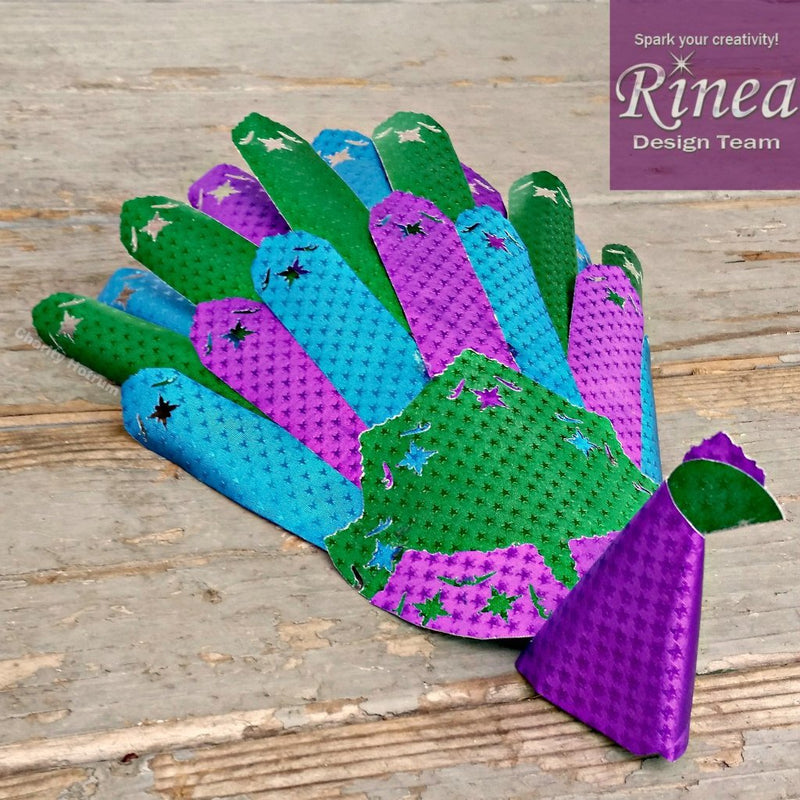
Body and Wings
#4 Circle of Emerald Foiled Paper
#4 Circle of Violet Foiled Paper
#2 Circle of Cardstock
Step 1: Trace and cut #4 Circle of Emerald/Emerald Starstruck Foiled Paper
Step 2: Line up the center lines of the #3 Circle Stencil with the edge of the Emerald Circle. Mark the three visible slots with a felt tip pen, very lightly so the pen does not leave a mark on the reverse side.
Step 3: Punch the circle five times, once on each line and between the lines.
Step 4: Trim between the punch marks with a craft knife so the edge resembles points or "feathers".

Step 5: Trace and cut #4 Circle from Violet/Violet Starstruck Foiled Paper
Step 6: Mark slots from #4 Stencil (again with a light hand) onto Violet Circle. Punch on Each Line.
Step 7: Trim between punch marks to resemble feathers.

Step 8: Cut "doily" in half, leaving four points on each side.
Step 9: Trim each doily portion down to 2 1/2 points. Set aside smaller portions for the head.
Step 10: Glue "wings" to back, trim off excess Violet to preserve the shape of Emerald body.
Step 11: Cut #2 Circle from cardstock. Glue to reverse side of the body. Trim off excess cardstock.
Step 12: Roll Emerald body over drinking glass to give it a curve. The cardstock provides bracing.

Tail
7-10 Strips, 6x1" of Green, Purple, Blue Foiled Paper
2 Strips, 12x7/8" Cardstock
Step 1: Cut strips of Foiled Paper, Punch Tips.
Step 2: Cut strips of cardstock.
Step 3: Trim and glue 1/2 inch piece of cardstock strip onto the back of each Foiled Paper strip.
Step 3: Trim and glue 1/2 inch piece of cardstock strip onto the back of each Foiled Paper strip.
Step 4: Roll each feather over a sharpie. Glue to Emerald body in an alternating color pattern.

I chose to do two rows of feathers. Gluing the second row of feathers is tricky but not impossible.

Head
#4 Circle Violet Rinea Foiled Paper
Remaining Wing Pieces
1.25" Circle Emerald Foiled Paper
Step 1: Trace and cut #4 Circle of Violet/Violet Starstruck Foiled Paper
Step 2: Cut 1" off the edge of Violet circle.
Step 3: Roll Violet Circle into a cone.
Step 4: Trim remaining pieces of wing-doily into a topknot. Glue together.

Step 5: Punch 1.25" Circle of Emerald/Emerald Starstruck Foiled Paper. Fold the circle in half.
Step 6: Position topknot in a folded circle. Glue circle closed.
Step 7: Position half circle in cone top. Trim as needed. Glue in place.

It will take some adjusting to get the head exactly where you want it. There is no "right" spot. Put it where you like it and call it good.

Step 8: Cut slit in the neck, 1 inch from the large opening of the cone for tail placement.
This step takes adjusting, but in the end, there is still no "right way".

I have wrapped my neck cone so that the Peacocks left side is his less beautiful profile. To make a facing pair simply wrap the neck cone the other way and arrange the topknot accordingly.

Stop by my blog Scrappin' Chaos for a list of supplies.
Scrap On!
~charity~