Quilled Maple Leaf by Roni


Hello friends, Roni here with a fun quilled leaf card that will create a lasting impression for a long time to come. I know it looks difficult but this is a very zen process that will knock the socks off anyone who sees it.
I'm not gonna lie, this is a time consuming process but it's well worth it in the end.

Gather up a cork board, a piece of clear acetate, a line leaf pattern that you like, straight pins and a quilling tool.
Cut the foiled paper into 1/4" x 12" long strips in the desired colors.
I will be using the Autumn Foiled Paper Variety Pack which consists of Ruby/Gold Glossy Foiled Paper, Ruby/Ruby Starstruck Foiled Paper; Marigold/Gold Glossy Foiled Paper, Marigold/Marigold Starstruck Foiled Paper and Mocha/Gold Glossy Foiled Paper, Mocha/Mocha Starstruck Foiled Paper.

Begin by assembling your quilling sandwich - place the leaf pattern on the cork board, cover with the acetate sheet and pin it all down to the cork board.
Glue together 7 or 8 pieces of Mocha Foiled Paper approximately 4" from the end of the strips. Pin it to the apex of the leaf veins on the pattern. Each strip will either become the leaf outline or a vein inside the leaf.
Place pins along the outside of the leaf design, weave the outer most strip of Mocha Foiled Paper around the pins to being the leaf outline.
Roll the Marigold strips on the quilling tool to create tight little rolls; slide the rolls off (note due to the "foil" in the foiled paper they will remain rolled for the most part). Continue to roll several little coils.
You will notice that your edges might have a white cast to them. That is because the core paper is white and it's perfectly normal. Simply rub the rolled coils over an ink pad to color those white edges. StazOn ink was used for this example.

To fill in the leaf you can leave some of the coils tightly rolled as you can see the two rolls closest to the leaf center. You can also unroll some of the coils to loosen them up so they can be pinched into the shape needed to fill in each gap of the leaf as shown. Some will need to be pinched tighter on one end than the other or may even take on a tear drop or diamond shape. Whatever works to fill in the space.
Use your favorite fast drying liquid glue to affix each roll to the leaf outline or previously placed roll. Use the straight pins to hold the pieces in place until the glue dries.

Pin each vein and the outline in place as needed as you work through the leaf.
Most fall leaves are made up of more than one color, as you can see I started off using Marigold/Marigold Starstruck Foiled Paper for the rolls. Part of the way through I switched to Ruby/Ruby Starstruck Foiled Paper.

I continued using the Ruby/Ruby Starstruck Foiled Paper for much of the remainder of the leaf.

I did switch back to Marigold/Marigold Starstruck Foiled Paper along the bottom edge below the last vein of the leaf.

Once the leaf was finished I rubbed a bit of Delicata Golden Glitz in the center portion of the leaf just to add a little extra bit of depth and dimension to the overall design.

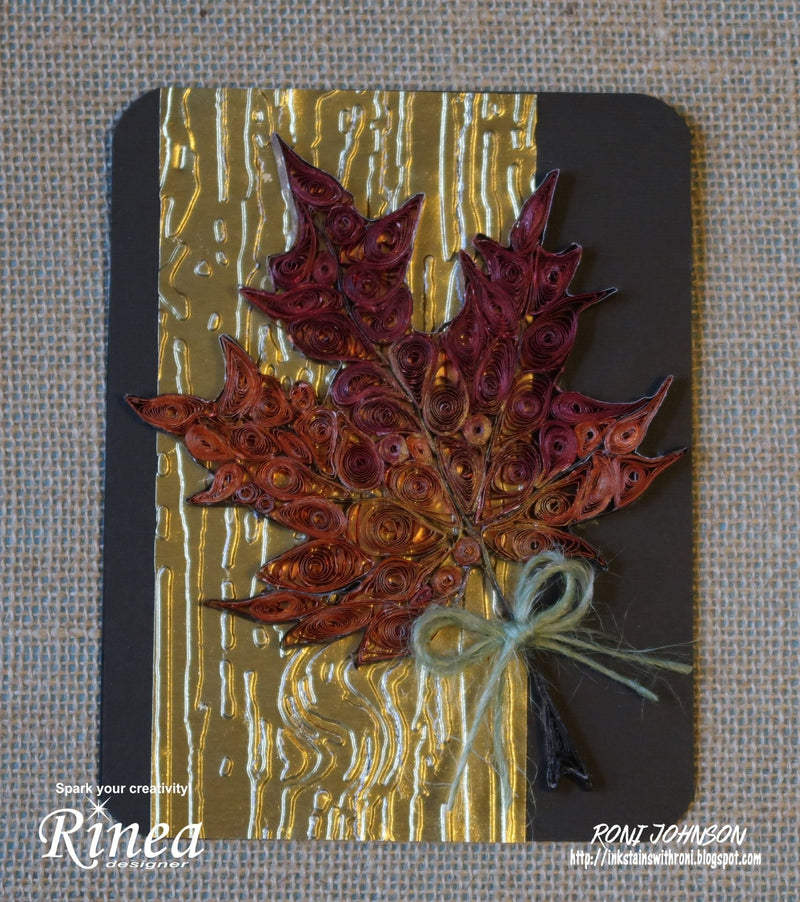
And here is what the finished leaf looks like....
You can use this quilled creation on whatever project you choose be it in a scrapbook, a mixed media canvas, card, etc. It's the perfect Autumn accent for anything you might be working on.


Supplies:
Rinea - Autumn Foiled Paper Variety Pack
Gold/Gold Glossy Foiled Paper
Imagine - StazOn Ink - Orange Zest, St. Valentine, Spiced Chai
Delicata - Golden Glitz
Fantastix
Prima - Green Twine
Brown Cardstock
Quilling Tools -
Paper Cutter
Slotted Quilling Tool
Cork Board
Acetate Sheet
Straight Pins
Leaf Pattern
Liquid Glue