Shamrock Shakin' with Roni

During the month of March, the Rinea design team is lucky enough to be pairing up our foiled papers with the lovely chipboard pieces from Creative Embellishments. One of their specialties is shakers which I absolutely love! I'd like to share one with you today.

Since I was doing a bit of embossing I thought it would be fun to incorporate the Ghost Ink 2.0 as well.

The shaker kits from Creative Embellishments has several parts to each kit. There is a solid shape which is the back piece, three outline shapes, and one clear window piece. It is easy enough to assemble as you will see below.


Step 2 - Cut away the excess foiled paper and smooth the edges with a bone folder.

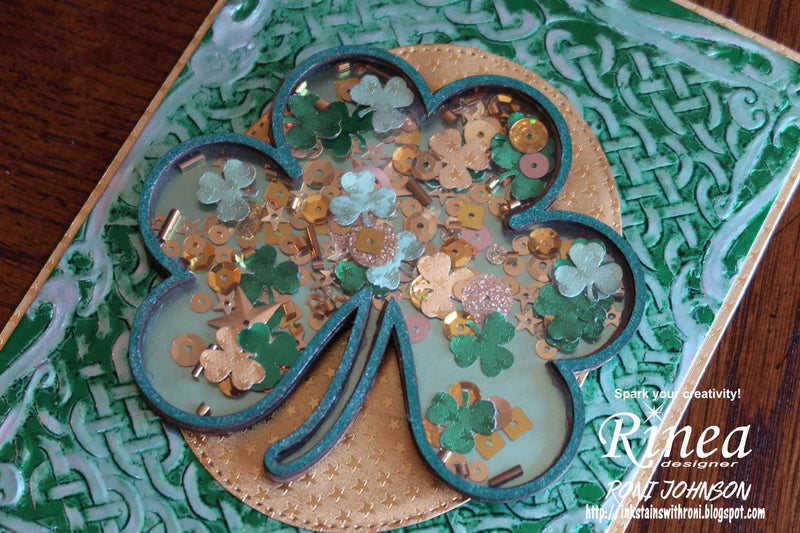
Step 3 - Glue one or two of the outline frames to the back. I used two for this example because I knew some of the shaker bits were taller than a single layer.

Step 4 - Use a shamrock paper punch to cut punchies from Emerald/Gold Glossy, Emerald/Emerald Starstruck, Jade/Gold Glossy, Jade/Jade Starstruck, and Gold/Gold Starstruck foiled papers.
Step 5 - Add several of the punchies to the shamrock shaker.

Step 6 - Add Gold Rush Sparkle Blends sequins mix to the shaker.
Step 7 - Glue the clear window in place over the filled shaker.
Step 8 - Affix the final frame to the top of the shaker and color as desired. A green glitter marker was used to color this example. Set the shaker aside for now.

Step 9 - Emboss a sheet of Emerald/Gold Glossy foiled paper with a Celtic embossing folder.
Note - it takes very little pressure to emboss Rinea Foiled Papers. If too much pressure is used it could create cracks or tears in the paper. It is best to experiment on scraps of foiled paper to find the sandwich that works best for your particular machine.

Step 10 - Gently rub the Ghost Ink 2.0 over the embossed foiled paper. Some of the color will transfer to the pad, this is normal and should be expected. It will not harm the pad or interfere with future use.
Step 11 - Let the ink dry and wipe the color away.

Step 12 - Trim the embossed panel to fit onto a card base that was covered with a sheet of Gold/Gold Starstruck foiled paper.

Step 13 - Die-cut an oval from Gold/Gold Starstruck foiled paper and adhere it to the center of the embossed panel.
Step 14 - Affix the shamrock shaker to the card.


Supplies:
Rinea - Emerald/Gold Glossy, Emerald/Emerald Starstruck, Jade/Gold Glossy, Jade/Jade Starstruck, Gold/Gold Starstruck, Ghost Ink 2.0
Creative Embellishments - Shamrock Shaker
Doodles Paper Playground - Sparkle Blends Gold Rush
MFT - Stitched Oval
Card Base