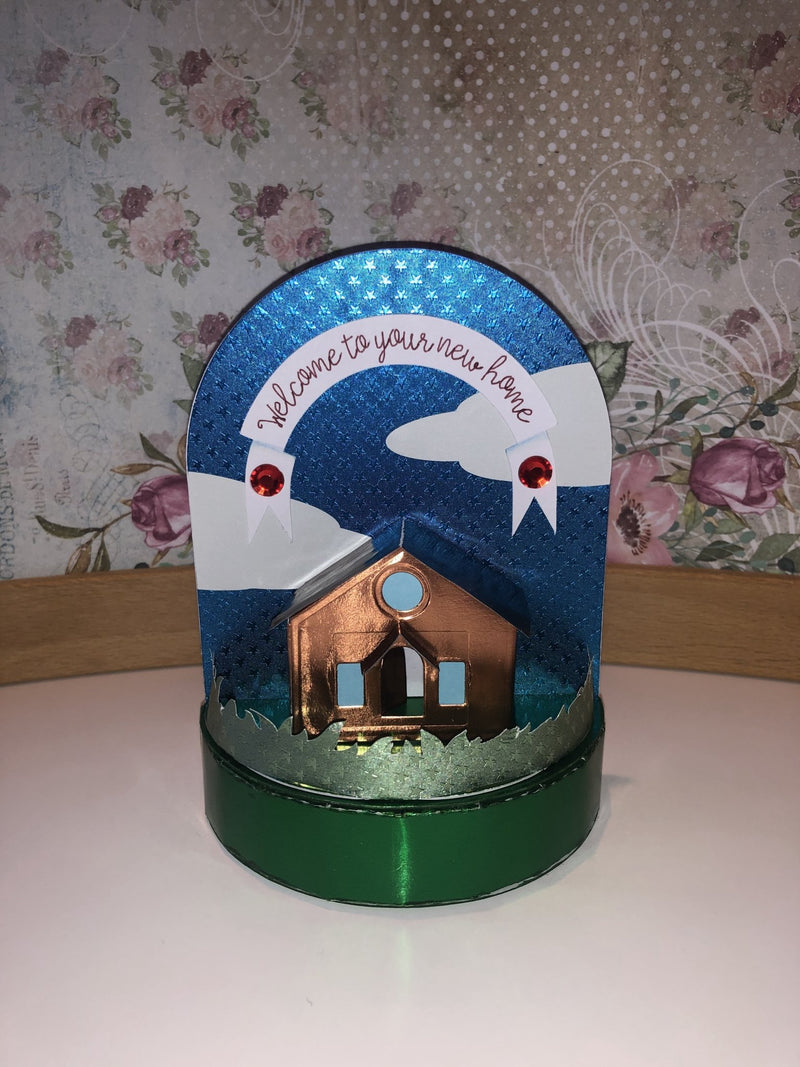
Snow Globe Style Card by Natalie Ballard


What you need:
- Sapphire starstruck, , Arctic, Copper, Woodlands pack Rinea Foiled Paper
- White Construction Card
- Double-sided adhesive sheet
- Electronic cutter or die set
- Red Gems
- Sizzix Paper Village Die Set 664741
Stage 1: File Prep/Die Selection

Base: Start with 2x 4” diameter semi-circles which you can cut on an electronic cutter or using basic shape dies. You will want to cut these from green foiled paper which has been adhered to construction card for rigidity.
Cut another strip from the same material that is long enough to reach all the way around the half circles so you can form a box base. You want this strip to be deep enough for both the desired depth of your box. In the case of this box, the strip measures 10.25”x0.85” excluding glue tabs. To save too much gluing, you can weld these three shapes together when using an electronic cutter.
I cut an extra 3⅞” semi-circle to hide the glue tabs for my border piece.

Back: The back is formed of another 4” diameter half circle and a 4” square that has bee welded together. You could use a snow globe base die or another plain die with an arch at the top. This is cut from blue foiled paper which has been laminated onto white card, as well as another piece of white card. Into the blue piece, cut two ½” slits ⅛” from the edges and ⅞” from the bottom for the grass border.
You can use the same shape to trim some cloud shapes for cutting from Arctic foiled paper (no extra card required for these).

Grass: You can use a grass border die to edge the base. You want a length of 6” plus glue tabs at either end and at the bottom.
Stage 2: Assembly


Base Assembly: Assemble the green base first as we need to allow this to set completely. Use a combination of both red liner tape and wet glue to stick these together.
House Assembly: While the base is setting, die cut 2 of the medium house from copper foiled paper mounted onto white card. Also die cut a set of windows from this shape, which you can either do at the same time as the original house cut, or separately.
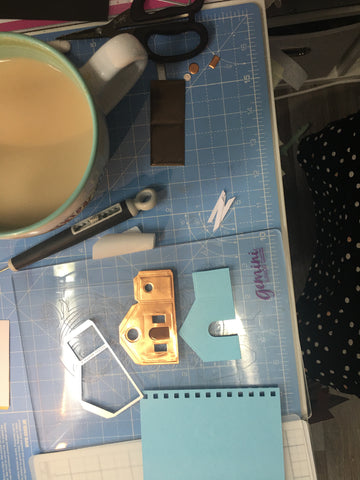
Cut another house from sky blue to go behind your windows. Cut it around the door if you want to open your door.
The medium roof can be cut from the chocolate mounted onto white card using double-sided adhesive.

Apply red liner tape to the glue tabs and fold and burnish well before peeling off the backing tape and adhering.

The bases of the houses are open so you can pop a bulb up them if you wish, but it does make adhering the houses to projects interesting. So I choose to adhere it to the back piece.
Back assembly: Adhere the blue back piece to your now set base using tape and glue. Insert your grass border and another, slightly smaller, semi-circle to hide your glue tabs on the base, and insert your end tabs through the slits in the back piece, fold and glue. Apply the white back piece to finish this tidily.


Decoration: Cut clouds and a banner to decorate your piece with your preferred sentiment: New Home, New School etc.

You can create a nice gift box for this project or just hand it over as is when we can all see each other again.